Astrophotography - Methods
Night sky portraits

Night sky portraits are a great way to get started in astrophotography. You
can photograph your favorite constelations, even relatively bright comets,
and some of the brighter deep sky objects. For example one of my first nights
taking some constelation pictures I decided to take one of Cygnus. I was
delighted when part of the North America nebula (NGC 700) showed up.
Equiptment
Camera capable of taking long exposures
Look for a B or Bulb setting.
An old SLR camera is perfect for this.
Lense with a medium to wide field focal length. 55mm or lower works well for
this.
Trypod - My trypod is the cheepest one Wal-Mart had and works well for my uses
Cable Shutter Release - Highly recommended to control the shutter
without shaking the camera. Get a good one, I had one from National Camera
break on the 2nd use. You can get a surprizingly good quality one from Orion telescopes and Binoculars for
about $20 US
Procedure
Set camera up on tripod
Set the camera exposure to its B or Bulb setting - this makes the camera
open the shutter for as long as you hold the button or shutter release cable
Set the exposure (/f ratio) to one of its lowest numbers. f/5.6 is a good
one
Focus camera at infinity
Aim at the constelation or part of the sky you want to photograph
Start the exposure by pressing and holding the shutter release button.
30 seconds will capture stars as well as the brighter deep sky objects.
Stop the exposure by depressing the button.
These are very general guidelines. Experiment! You'll be suprized what
you can get doing this
Piggy Back - Mounting a camera on top of an equitorial telescope to
track the stars movement through the sky

About
By mounting a camera on top of a telescope (Piggy Backing) you can achive
longer exposures by compensating for the Earth's rotation and following the
stars through the sky. This also allows higher focal lengths than the Night
Sky Portrait method
Equiptment
A telescope with an equitorial mount
A clock drive for the equitorial mount
Camera capable of taking long exposures (Look for a B or Bulb setting)
Cable Shutter Release for the camera capable of locking for hands free
operation. You will need your hands for guiding.
A camera adaptor for your telescope that works like a standard tripod
(1/4" bolt)
 1/4" Camera
Adaptor
1/4" Camera
Adaptor
A high magnification eyepiece (8mm or smaller FL).
An illuminated reticle eyepiece is highly recomended, and virtually required
if you're using a long (100mm or greater) focal length lense on the camera. This is an eyepiece
with illuminated crosshairs.
Procedure
Align: Polar align the telescope
Focus: With the camera focused at infinity, or focus on a brigther star (not
too bright).
Set the camera's shutter time to B or Bulb
Aim: This can be very dificult, it helps to calculate the field of view
of your lense compare on a star chart what you will see when the object is
centered.
Start the clock drive
Find a guide star through the telescope and center it in your eyepiece,
make sure it's tracking well by watching it for a minute or so
Start the exposure by locking down the shutter release
Guide: make occasional corrections, for example move the guide star to
the center of the eyepiece every 30 seconds or so.
When you think you've exposed long enough (or a car is comming and is
about to shine right into your lense!) stop the exposure by unlocking the
shutter release.
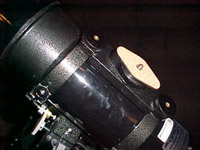
Afocal coupling - Photography through the telescope

About
Afocal coupling is the same as holding a camera with lense up to the eyepiece of the
telescope. For best results you will want to use a mount. Shown in the picture is Orion's steadypix camera mount
connected to my Sony Mavica digital camera through the 1/4" tripod mount and
clamped on to a 10mm eyepiece.
With afocal coupling it is better to use a digital camera or a
web cam than film.
Equiptment
Telescope - preferably with a clock drive
Camera - preferably digital or web cam
Camera Mount - highly recommended, you can also use a tripod and get okay
results
Remote shutter release - highly recommended, preferably one with an
interval timer
Procedure - taking the pictures
If your camera has manual focus capability, set it to manual and focus on
infinity
If your camera lets you change the exposure, set it to the lowest number
(widest aperture)
If your camera lets you set the ISO, set it to the highest setting in
order to achive the shortest exposure time.
Make sure your lense is as close to your eyepiece as you can get within
reason, taking care not to scratch your lense or filters.
If you are using a camera mount which couples to the eyepiece, allign the eyepiece to the camera before attaching the eyepiece
to the telescope. Pointing the camera and the eyepiece at a light source
can make it easier to center the eyepice. Once adjusted, make sure the mount is tight enough that
under the weight of your camera everything stays in line.
Focusing the telescopoe can be very difficult. Depending on your
target, it may be easier to focus on a bright star. Spend a lot of time to
make sure you have good focus.
Center your target. Depending on the focal length of the lense and
eyepieces used, with afocal coupling it is often very important your
target remains center of the image. Sometimes there is a blind spot around
the edges, or at the very least vignetting.
If your camera allows you to control the shutter speed select the one
that gives you the most detail. You may want to look up in a chart, or use
software such as the Afocal Coupling calculator (Eyepiece Projection
Calculator)here.
Take as many exposures of your target as you can. As the atmosphere is
always moving and blurring your images, the more images you
take the more you can stack and correct for this. You can achieve sharper
images this way.
Procedure - stacking/processing the pictures
Under contruction - author got distracted
Back to Eric's Astronomy page
Back to Eric's page


 1/4" Camera
Adaptor
1/4" Camera
Adaptor